Cucumber basics for an Android, Appium & Cucumber test project

From writing the first lines of a cucumber test case to best practice tips, this post makes note of some techniques that can be used in any cucumber testing project.

Some of the information within is based upon The Cucumber Book & Cucumber and Cheese. Refer to the Cucumber website, for all things Cucumber & Gherkin related!

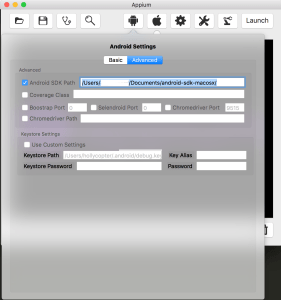
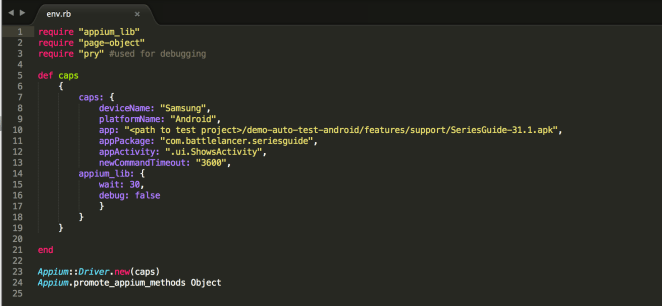
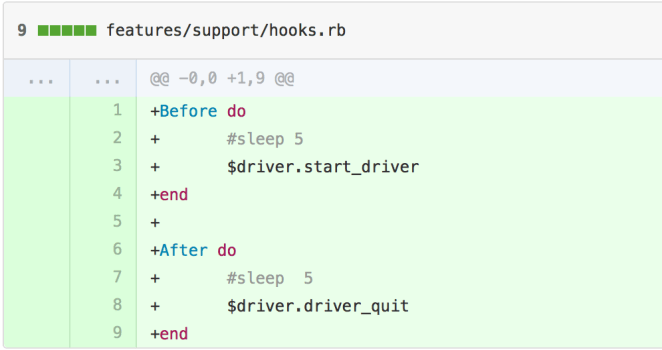
Prerequisite: Test project is configured with cucumber installed. Please see guide to setting up test framework for Android, Appium, Cucumber, Ruby

Background

Cucumber is a tool that supports Behavioural Driven Development (BDD) practices. It provides the ability to specify a system’s behaviour in plain English text, making the test scripts human readable on the highest level of abstraction. Cucumber focuses on the end user experience, and the style of writing tests allows for reusability & scalability.

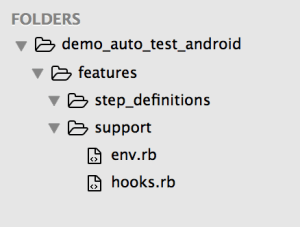
Cucumber / Ruby framework file structure

Note that there are Ruby gems which can create this file structure automatically. For reference purposes, the basic file structure that a cucumber/ruby project requires is:

screen-shot-2016-10-05-at-3-07-28-pm 

Once the test project contains the basic file structure, if you execute: cucumber command at your test project’s root directory, you can verify that your cucumber project is configured correctly when output that includes the number of scenarios and steps is returned.

screen-shot-2016-10-05-at-3-17-40-pm

1st Cucumber Scenario

Inside the features folder, multiple .feature files can be created, grouped according to system features.

Using the Gherkin language, each test case can be written according to the syntax provided below. The words in pink font are reserved words in Cucumber/Gherkin.

screen-shot-2016-10-05-at-3-26-23-pm

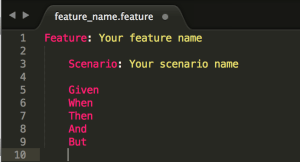
The Feature represents features within the system under test.

The Scenario represents the requirement, such as a business rule. Effectively, these represent test cases.

The test case steps can be written using the Gherkin reserved words:

Given – the pre-requisite

When – the action

Then – the outcome

And & But – these reserved words are used to make the steps more readable.

The test case steps are later defined in step definition files, to enable the tests to interact with the system’s code base.

By separating the feature files and step definition files, the test cases remain human readable, and the step definitions (and page object files) become the go-to place for maintaining the test cases when the code base changes.

Note that the keyword (Given, When, Then, And, But) does not actually effect your test step. Example:

When I click on the home button

&

Then I click on the home button

These two steps operate exactly the same when the test is executed. The keyword is only used for human readability of the test steps, but is ignored when the test case is executed. So in this case, only one step definition is required.

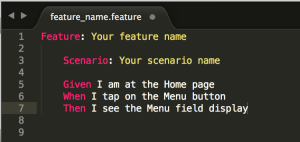
Example of a completed Cucumber feature:

screen-shot-2016-10-05-at-3-51-26-pm

Generate Ruby step definition snippets

The next step to creating a cucumber test, is to define the steps of a feature, by associating them to the system under test’s code base, via the step definition files.

When the cucumber command is executed, 2 things will happen: 

  1. test cases will be executed
  2. step definition snippets will be created for any feature that does not have step definitions defined

To generate step definition snippets (without executing test cases), run:

cucumber –dry-run

The result will return snippets of code that can be copy/pasted into the corresponding step definition files. Example: 

screen-shot-2016-10-05-at-3-53-40-pm

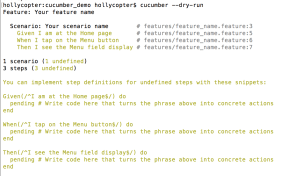
See the automatically generated Ruby script!?

Define Ruby Step Definitions

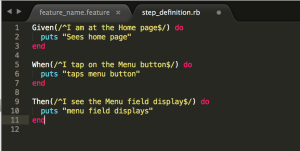
Using the step definition snippets, enter Ruby code into the methods, in order to drive a test case.

Example: (Ruby commands to print information to log file have been added to the step definition file)

screen-shot-2016-10-05-at-3-59-12-pm

To execute the test case:

cucumber

And the result will be: 

screen-shot-2016-10-05-at-4-01-16-pm

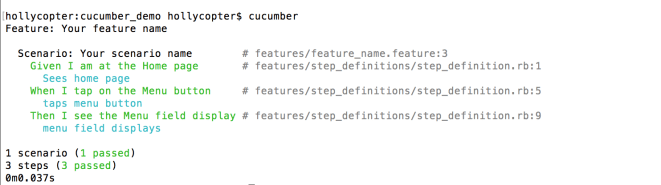
Here, you can see the result of the print commands, along with the test case results and test execution time.

This demonstrates the basic concepts for Cucumber test creation. However, in order to drive a test against the code base for an Android/Appium/Cucumber project, we need to enter Ruby/Appium steps into the step definitions so that we can integrate with the code base.

Implement step definitions for Appium with Ruby

In order to interact with the Android native application code base (for SeriesGuide) application, using Appium, we need to enter step definitions that locate elements using the Appium locators & selenium commands. This information will be provided in a separate post. 

Keeping the Cucumber code DRY

Various techniques can be used in Cucumber to keep the code ‘DRY’ (Do Not Repeat Yourself!).
These techniques will be covered in a separate post. 


Inspecting elements in a native Android app using UI Automator Viewer

In any test script, elements will need to be inspected in order to determine the element’s locators so that you can drive the tests and verify that the actual functionality meets expectations.

This post will cover how to inspect a native Android application’s elements using UI Automator Viewer.

The information provided is based on the understanding that Android SDK or Android Studio is already installed, in addition to having an emulator or device that has a native Android application installed. Refer to the android app automation configuration guide for further details.

Inspect elements using UI Automator Viewer

Compared to using Appium, I prefer to inspect elements using UI Automator Viewer. In my experience, UI Automator Viewer is faster and more stable for this task.

Pre-requisites

  1. Launch the target application on selected Emulator or Connected device
  2. Check your emulator/device is connected to your development machine. Via command line, access your Android SDK tools folder and execute:
    >> ./adb devices
  3. Check that uiautomatorviewer is installed on your machine. Inside the Android SDK tools, list the files and to check that “android-sdk-macos/tools/uiautomatorviewer” is available.
    1. Note that it is installed via Android Studio or Android SDK. Refer to the post about the android app automation framework configuration if you need further details.

1. Launch UI Automator Viewer

  1. On command line, access your Android SDK tools folder & start the uiautomatorviewer:
    >> ./uiautomatorviewer

2. Inspect elements

  1. Using your emulator or device,  navigate to the screen with the element that you wish to inspect
  2. In the UI Automator Viewer interface, select the Device Screenshot button to capture a screenshot
  3. Interact with the screenshot by hovering and highlighting the elements you’d like to inspect
  4. Select an element (indicated on the screenshot by red highlight) and inspect the underlying code via the UI Automator interface

screen-shot-2016-09-30-at-9-57-18-pm

For further information, refer to the Android Developer documentation about UI Automator Viewer.

Inspect element using Appium

As mentioned, only in my own personal experience, I have found that inspecting elements in Appium is much more time consuming compared to UI Automator. However, Appium can most certainly be used to inspect elements. You can find further information about that in the Appium documentation, under Appium.app inspector section.

Converting the details from the inspector into a solid locator for your Appium automation tests

After the elements have been inspected, the locators required for Appium can be determined. The next post will cover how you can use the inspector to work out the locator required for Appium.


Configuring an appium test project for a native android app

Notes from setting up an Appium, Cucumber & Ruby automated test project for a native Android application

The automated test project is based on Uwe Trottman’s SeriesGuide, a public licensed Android application, that enables Android users to keep track of their favourite TV shows and movies.

The notes below are relevant to: Mac OSX El Capitan, Appium v. 1.5.3, Genymotion 2.8.0 & ruby v. 2.0.0p648.  

requirements

Computer configuration:

  • IDE suitable for Ruby, with plugins to format cucumber/gherkin
  • Ruby
  • Ruby gems
    • install via Terminal >> sudo gem install <gem name>
    • refer to ruby gems documentation for further details
      • cucumber
      • rspec
      • page-object
      • appium_lib
      • pretty_face
      • pry
  • Install Android-SDK
    • Note that you could also install Android Studio, to get the command line tools which are required by this project as an alternative to installing Android-SDK.
  • Install Genymotion
    • Add a virtual device such as ‘Custom Phone – 6.0.0 – API 23 – 768×1280
    • Start the emulator
    • Check for active connection, via the command line under the/android-sdk-macosx/platform-tools folder:
      • >> ./adb devices 
      • the output should display the active, connected emulator
  • Install Appium
  • Download the latest SeriesGuide .apk file

Create a test project

To manually create the project:

Create a new test project directory where you like on your computer, e.g. ‘demo_auto_test_android’. Open the folder in your text editor, and then create a file structure as follows:

screen-shot-2016-09-20-at-12-26-24-pm

Note! To automatically create the project, you could use a ruby gem such as ‘testgen’ and in the directory where you wish to create your test project, run the following command in Terminal: 

testgen <project name> –with appium 

As a result of this script, you’ll find all of the folders & files that you need. Note however, that the project structure is slightly different to what I’ve used in my test project. However, ‘testgen’ can be a really useful tool once you’re confident in configuring your own projects according to your own requirements.

Copy the android app to your test project

Create a copy of the SeriesGuide-31.1.apk file and save it into your test project, under the support folder.

Install the android app on emulator (or test device)

SeriesGuide app needs to be running on the emulator or device, in order to test it.

From the /android-sdk-macosx/platform-tools folder in Terminal, execute:

./adb install /<path to your test project>/features/support/SeriesGuide-31.1.apk

Check that the installation was successful, by opening Applications menu on your emulator, selecting SeriesGuide and running it to ensure it functions correctly. Check out the app & get familiar with its features. Make a list of the functionality that you’d like to automate.

Configure Appium for your test project

Open Appium, and configure the Basic & Advanced Android settings:

screen-shot-2016-09-20-at-12-47-35-pm     screen-shot-2016-09-20-at-12-52-38-pm

  • App Path – point to your test project’s /features/support/SeriesGuide .apk file
  • Platform name – Android
  • Automation Name – Appium
  • Platform Version – Must match your emulator version
  • Device Name – Must match your emulator device name
    • Note that the settings in the screenshot match the emulator suggested in Genymotion installation steps. 


Configure the test project env.rb file

In your text editor, access your test project’s env.rb file, and add the following code:

screen-shot-2016-09-20-at-1-00-15-pm

  • deviceName – must match your emulator/appium device name
  • platformName – must match your emulator/appium platform name
  • app – must link to the .apk file in your test project
  • appPackage – this can be found using the following process described on StackOverflow (note that the value above is correct for SeriesGuide app)
  • appActivity – this can be found using the same process as app package (note that the value above is correct for SeriesGuide app)

Configure the test project hooks.rb file

screen-shot-2016-09-20-at-1-09-28-pm

Note that we will configure the hooks file, further, later. This is the basic configuration required to start the appium driver before your tests run, and quit the appium driver after the tests end.

Start writing your first cucumber feature file

At this stage, all configuration for your test project is complete, and you are ready to create your first cucumber feature.


copyright 2016, Holly Marshall

Mobile Specific Test Checklist

I created a testing checklist relevant to testing on mobile devices. The checklist can be applied to testing native apps, hybrid apps & websites. Each test criteria will not always apply under every condition on every application, however, the checklist is designed as a tool to remind testers to focus on tests specific to the mobile platform and to provide a talking piece on which to spark more creative mobile specific tests.

Can you think of new mobile features that also need to be covered?

Display

  • Orientation – Portrait, Landscape
  • Screen size
  • Screen resolution

Random tests (“Handbag testing”)

  • Rotate screen
  • Shake screen
  • Phone call interruption
  • Stay on open page for a long time
  • Lock screen startup
  • Get creative!

Location based functionality

  • Location services – ON (overall and application specific)
  • Location services – OFF (overall and application specific)
  • GPS On
  • GPS Off
  • Test after clear location
  • Test as user “on the move”

Map functionality

  • Location services – OFF
  • Location services – ON
  • Compare to google maps, native apple maps

Date / Time

  • Server side date/time
  • Client side date/time (device settings – automatic, specific, manual)
  • Timezones
  • Device calendar settings – gregorian, buddhist, japanese
  • Device region settings

Storage

  • Data stored to device
    • data available after hard close
    • data not available after app reinstallation
  • Data stored to cloud / external service
    • data available after hard close
    • data available after app reinstallation
  • Delete app data via settings
  • Clear app from phone cache
  • Cookies for web pages

Performance / Stability

  • Are loading times acceptable according to connection speed? 2G, 3G, 4G, WiFi, etc.
  • What happens when network drops out?
  • Are page transitions smooth?
  • Are animations smooth?
  • Is battery drained by app?
  • Does app crash due to memory leaks etc?
  • Do cached pages load quickly?
  • Do non cached pages load in acceptable time?
  • How much space does app take up on device?

Handling content

  • Display upper boundary value
  • Display lower boundary value
  • Display popular value(s)
  • Null value
  • Characters: Alpha, Numeric, Special, Foreign
  • HTML escaped
  • Data mapping

User input fields

  • Upper boundary value
  • Lower boundary value
  • Upper boundary value +1
  • Lower boundary value -1
  • Characters: alpha, numeric, special, foreign, spaces, all spaces
  • Digits: numeric, negative, positive, currency, decimal, spaces, all spaces, alpha, special chars (currency symbols, commas, decimal points etc)
  • Client side & server side tested
  • Security: Inject SQL, Inject HTML

Security

  • Is user information accessible?
  • Is sensitive data accessible?
  • Can we view a user’s sensitive data (Credit card etc) in:
    • xCode/Android Studio log files?
    • web service requests?
    • backend log files?
    • databases? (encryption may be required at DB level for sensitive data)
  • Can we view a user’s credit card information after navigating away from a page?
  • Can we view private information in URLs?
  • Secure login
  • Integration to 3rd party authentication

Compatibility

  • Supported Operating Systems
  • Supported Devices
  • Popular screen sizes / resolutions
  • Connection speeds 2G, 3G, 4G, WiFi
  • Desktop (for responsive websites, or for web views)

Close application

  • Soft close – phone call interruption, timeout screen interruption, view other application interruption
  • Hard close – delete application from phone’s memory, uninstall application

Caches (client side)

  • cache override when page reloaded
  • cache override on clear cookies
  • cache override on delete from phone memory
  • cache expires after (cache time period)

Alerts

  • Received according to client’s timezone
    • or is it appropriate to set the alert on server timezone?
  • Allow alerts
  • Do not allow alerts
  • Turn off alerts

Special features

  • audio
  • video
  • animations
  • welcome screens
  • navigation
    • android device back button
    • browser back button
    • home buttons


Author: Holly Marshall