Notes from setting up an Appium, Cucumber & Ruby automated test project for a native Android application
The automated test project is based on Uwe Trottman’s SeriesGuide, a public licensed Android application, that enables Android users to keep track of their favourite TV shows and movies.
The notes below are relevant to: Mac OSX El Capitan, Appium v. 1.5.3, Genymotion 2.8.0 & ruby v. 2.0.0p648.
requirements
Computer configuration:
- IDE suitable for Ruby, with plugins to format cucumber/gherkin
- RubyMine is highly recommended (30 days free trial) or Sublime Text is a suitable alternative. (I used SublimeText).
- Text editor plugins: Package Control.Sublime Package, including selections: sublime gherkin formatter, cucumber-completion
- Ruby
- usually pre-installed on Mac
- refer to ruby documentation for further details
- Ruby gems
- install via Terminal >> sudo gem install <gem name>
- refer to ruby gems documentation for further details
- cucumber
- rspec
- page-object
- appium_lib
- pretty_face
- pry
- Install Android-SDK
- Note that you could also install Android Studio, to get the command line tools which are required by this project as an alternative to installing Android-SDK.
- Install Genymotion
- Add a virtual device such as ‘Custom Phone – 6.0.0 – API 23 – 768×1280
- Start the emulator
- Check for active connection, via the command line under the/android-sdk-macosx/platform-tools folder:
- >> ./adb devices
- the output should display the active, connected emulator
- Install Appium
- Download the latest SeriesGuide .apk file
Create a test project
To manually create the project:
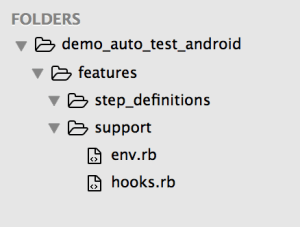
Create a new test project directory where you like on your computer, e.g. ‘demo_auto_test_android’. Open the folder in your text editor, and then create a file structure as follows:
Note! To automatically create the project, you could use a ruby gem such as ‘testgen’ and in the directory where you wish to create your test project, run the following command in Terminal:
testgen <project name> –with appium
As a result of this script, you’ll find all of the folders & files that you need. Note however, that the project structure is slightly different to what I’ve used in my test project. However, ‘testgen’ can be a really useful tool once you’re confident in configuring your own projects according to your own requirements.
Copy the android app to your test project
Create a copy of the SeriesGuide-31.1.apk file and save it into your test project, under the support folder.
Install the android app on emulator (or test device)
SeriesGuide app needs to be running on the emulator or device, in order to test it.
From the /android-sdk-macosx/platform-tools folder in Terminal, execute:
./adb install /<path to your test project>/features/support/SeriesGuide-31.1.apk
Check that the installation was successful, by opening Applications menu on your emulator, selecting SeriesGuide and running it to ensure it functions correctly. Check out the app & get familiar with its features. Make a list of the functionality that you’d like to automate.
Configure Appium for your test project
Open Appium, and configure the Basic & Advanced Android settings:

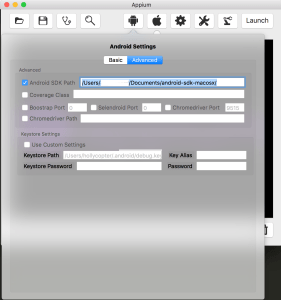
- App Path – point to your test project’s /features/support/SeriesGuide .apk file
- Platform name – Android
- Automation Name – Appium
- Platform Version – Must match your emulator version
- Device Name – Must match your emulator device name
- Note that the settings in the screenshot match the emulator suggested in Genymotion installation steps.
Configure the test project env.rb file
In your text editor, access your test project’s env.rb file, and add the following code:
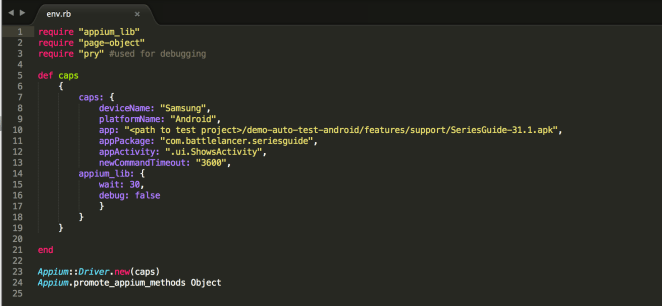
- deviceName – must match your emulator/appium device name
- platformName – must match your emulator/appium platform name
- app – must link to the .apk file in your test project
- appPackage – this can be found using the following process described on StackOverflow (note that the value above is correct for SeriesGuide app)
- appActivity – this can be found using the same process as app package (note that the value above is correct for SeriesGuide app)
Configure the test project hooks.rb file
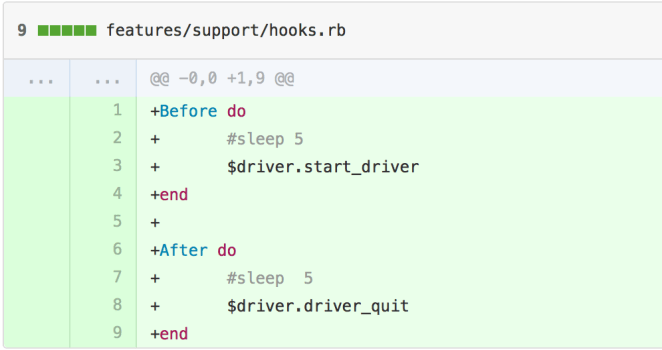
Note that we will configure the hooks file, further, later. This is the basic configuration required to start the appium driver before your tests run, and quit the appium driver after the tests end.
Start writing your first cucumber feature file
At this stage, all configuration for your test project is complete, and you are ready to create your first cucumber feature.
copyright 2016, Holly Marshall
